Qualitative and Mixed Methods Data Analysis with Dedoose
25 Qualitative Data Analysis with Dedoose: Coding
Mikaila Mariel Lemonik Arthur
The process of coding in Dedoose begins with the creation of a code tree. Once the code tree is created, then codes can be applied to segments of text or other media. This chapter will step users through the process of creating a code tree and applying codes, as well as other issues in working with codes and coding in Dedoose.
The Code Tree
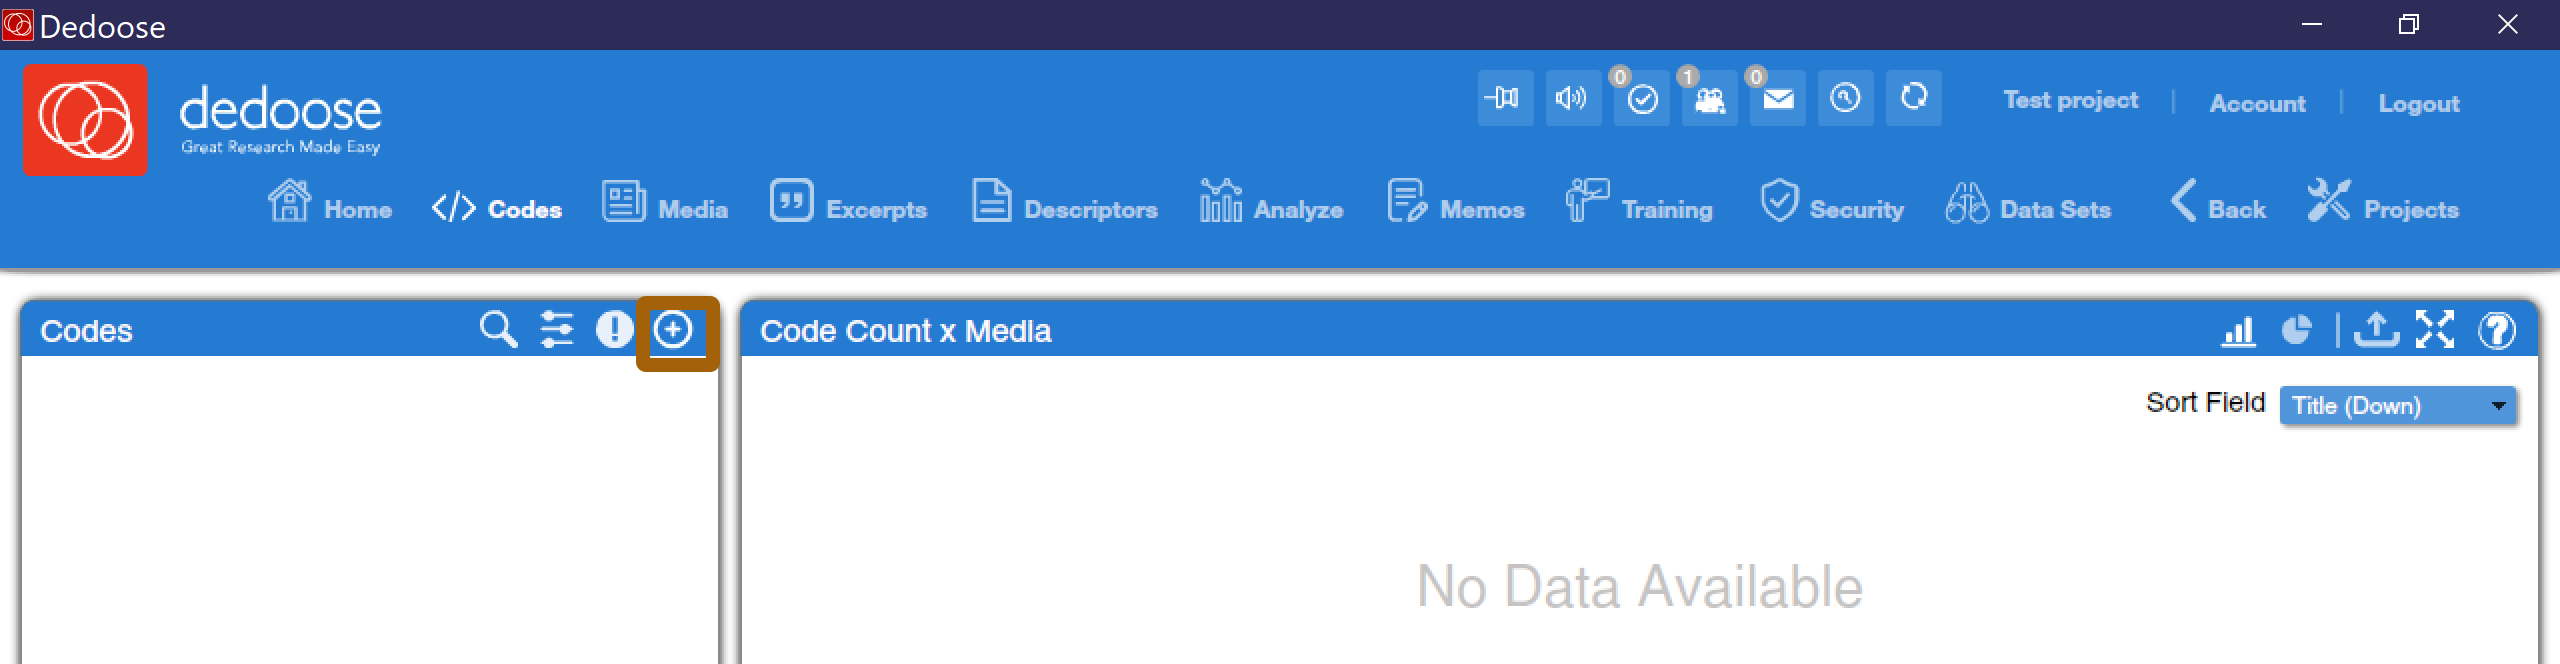
In order to begin coding, analysts must first develop a code tree, as discussed in the chapter on Qualitative Coding. Once the code tree has been developed, it can be added to Dedoose so that it is ready to use. Codes can be added using the Codes section of the Dedoose home page or by selecting “Codes” from the menu at the top of the screen, and then clicking the ⊕ (plus sign in a circle) symbol.
Clicking the ⊕ icon brings up a pop-up window into which users can enter a code. The window asks for a title, which is the term used to identify that code in the list of codes. This title should be clear and brief. For example, rather than writing “An instance of the use of stereotyping by the respondent” you would write “stereotyping.”
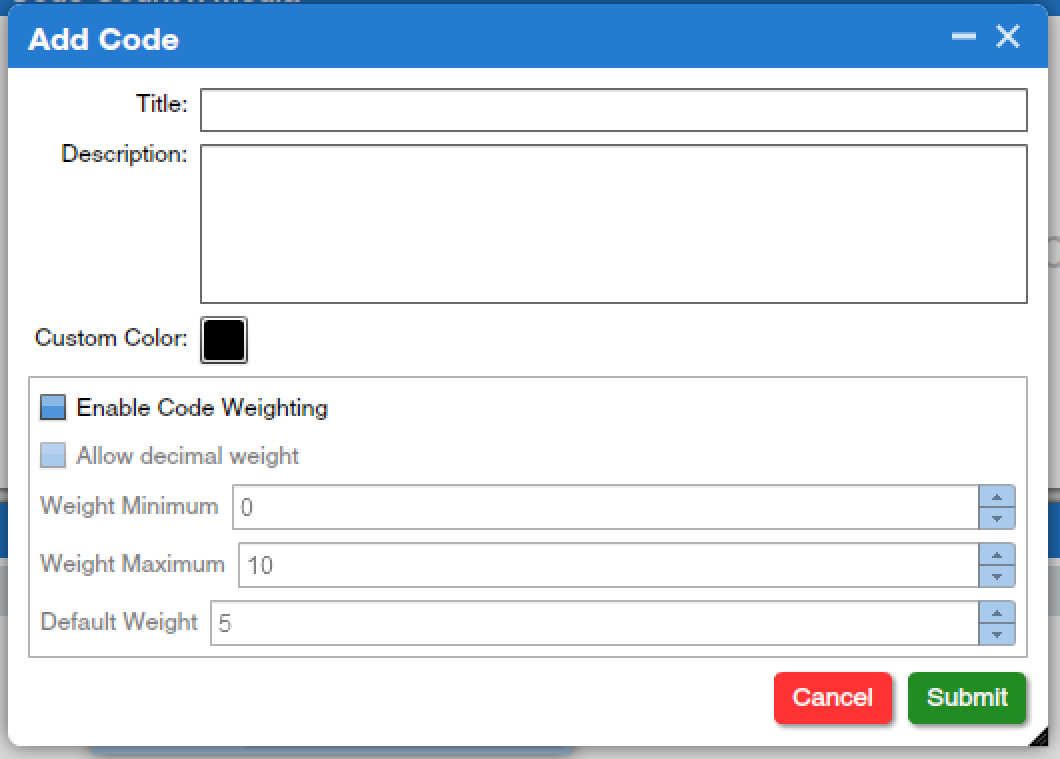
The description box provides space to enter a longer explanation of the code and the circumstances in which it should be used, which is especially useful when coding with multiple coders or over a longer period of time so everyone can keep track of the meanings behind codes. Users can also change the color of the code (note that using this feature also requires changing a setting, which will be discussed below). Finally, if code weighting is part of the project, users can enable it and specify minimum, maximum, and default weights. Weighting is used when analysts wish to not only code the text, but also indicate the degree to which a code applies. For example, if a study involved codes representing a variety of emotions—happy, sad, angry, excited, satisfied, etc.—weighting could be used to distinguish pleased from ecstatic and gloomy from devastated by applying a 1 to the more mild emotion, a 2 for a moderate emotion, and a 3 for a more intense emotion. While the rest of this text will proceed without involving code weighting, you may wish to explore its use in projects you are completing.
In many cases, analysts develop code trees that have multiple levels of nested codes. For instance, in the example above of emotion codes, the code tree might look something like this:
Emotions
       Happy
             Pleased
             Joyous
             Ecstatic
       Sad
             Gloomy
             Dejected
             Devastated
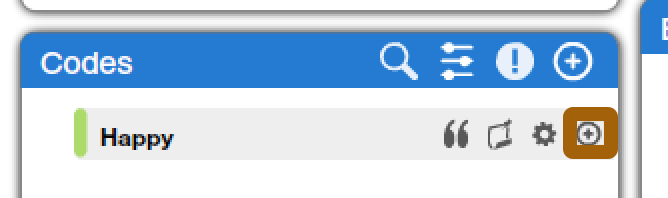
To set the code tree up in this way, Dedoose uses the language of “parent codes” (those at the top or first level of the tree, like emotions in this example) and “child codes” (those at lower levels of the tree). First, analysts need to enter a parent code into the coding system, as shown above. Then, they can use the ⊕ symbol next to that code to add a child code, using just the same dialog box shown in Figure 2 above. Figure 3 also shows an icon of a gear shift, next to the ⊕ symbol—this gear shift can be used to re-open the dialog box for editing the code.
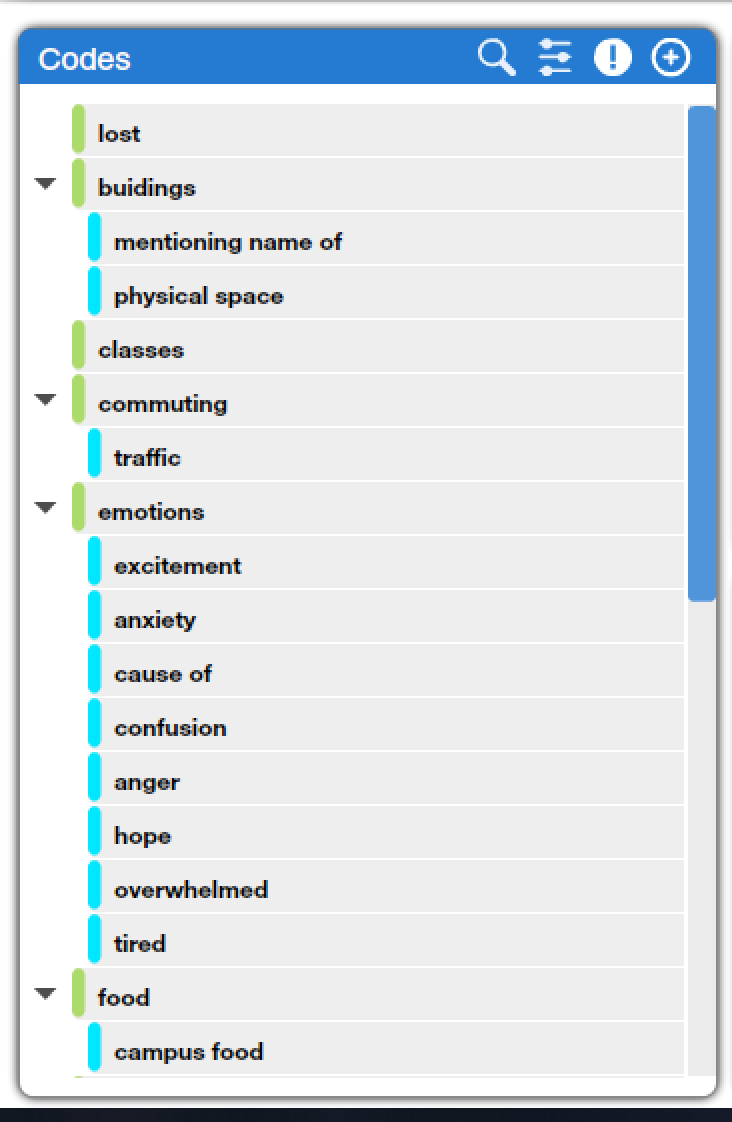
Once codes are added, the code tree will look something like the one shown in Figure 4. The little triangles can be used to open and close parent codes, making child codes visible or hiding them. Note that there can be multiple levels of codes, so an analyst could add additional child codes under, say, anxiety or confusion.
The magnifying glass at the top of the codes window can be used to search all of the codes used in a project, which can be helpful when the code tree gets very lengthy. There are also two other icons at the top of the code tree, one that looks like little slider bars and one that looks like an exclamation point in a circle. The sliders allow the analyst to set options for how coding will proceed.
- Automatic upcoding: When automatic upcoding is turned on, any time that a child code is used while coding, the parent code will also be applied to the same segment of text.
- Sort alphabetically: Just as it sounds, this option reorders codes in alphabetical order, which can make it easier to find them in a lengthy code tree.
- Code counts: The code counts option displays the number of times each code has been used in a project right in the code tree next to the code itself. There are two ways to implement code counts. In the first, “explicit code count,” just instances in which the code itself has been used are counted, while in the second, “child sum code count,” the sum of all uses of all child codes is displayed next to each parent code.
- Color scheme: Changing the color scheme to “custom” allows for the use of colors designated in the process of adding codes to be used in the display.
The exclamation point icon provides a number of useful tools:
- Collapse/Expand: This tool is the equivalent of going through and clicking all of the little black triangles one at a time—when clicked, it toggles the code tree between having all parent codes closed, such that child codes are hidden, and having all parent codes open, such that all child codes are visible.
- Retroactive upcode: This tool is used when, having not turned on “automatic upcoding” (as discussed above) at the beginning of a coding process, the analyst decides later that they would like the parent code applied to all instances where the child code is used.
- Reorder codes: This tool allows the analyst to reorganize the code tree into a different order.
- Import codes: This tool permits for the importation of codes from a Microsoft Excel or comma-separated file.
- Export codes: This tool permits the analyst to export codes to Microsoft Excel or Microsoft Word.
Once all settings and options have been set to the analysts’ preference and the code tree has been added, it is time to start coding. Note that it is possible to change settings and add codes during the coding process. However, it is very important that, if a new code is added during the coding process, the analyst goes back to all texts that have already been coded and re-codes them. Otherwise, that new code will be used for only part of the dataset, which will introduce errors into the data analysis process.
Coding in Dedoose
In order to apply codes to texts, the first step is to create an excerpt. To create an excerpt, load a media item, highlight a segment of text to which one or more codes should be applied, and click the quotation mark in the corner of the document screen, as shown in Figure 5. If you have made a mistake in your selection, you can click the X next to the quotation mark in the “Selection Info” box to delete it.
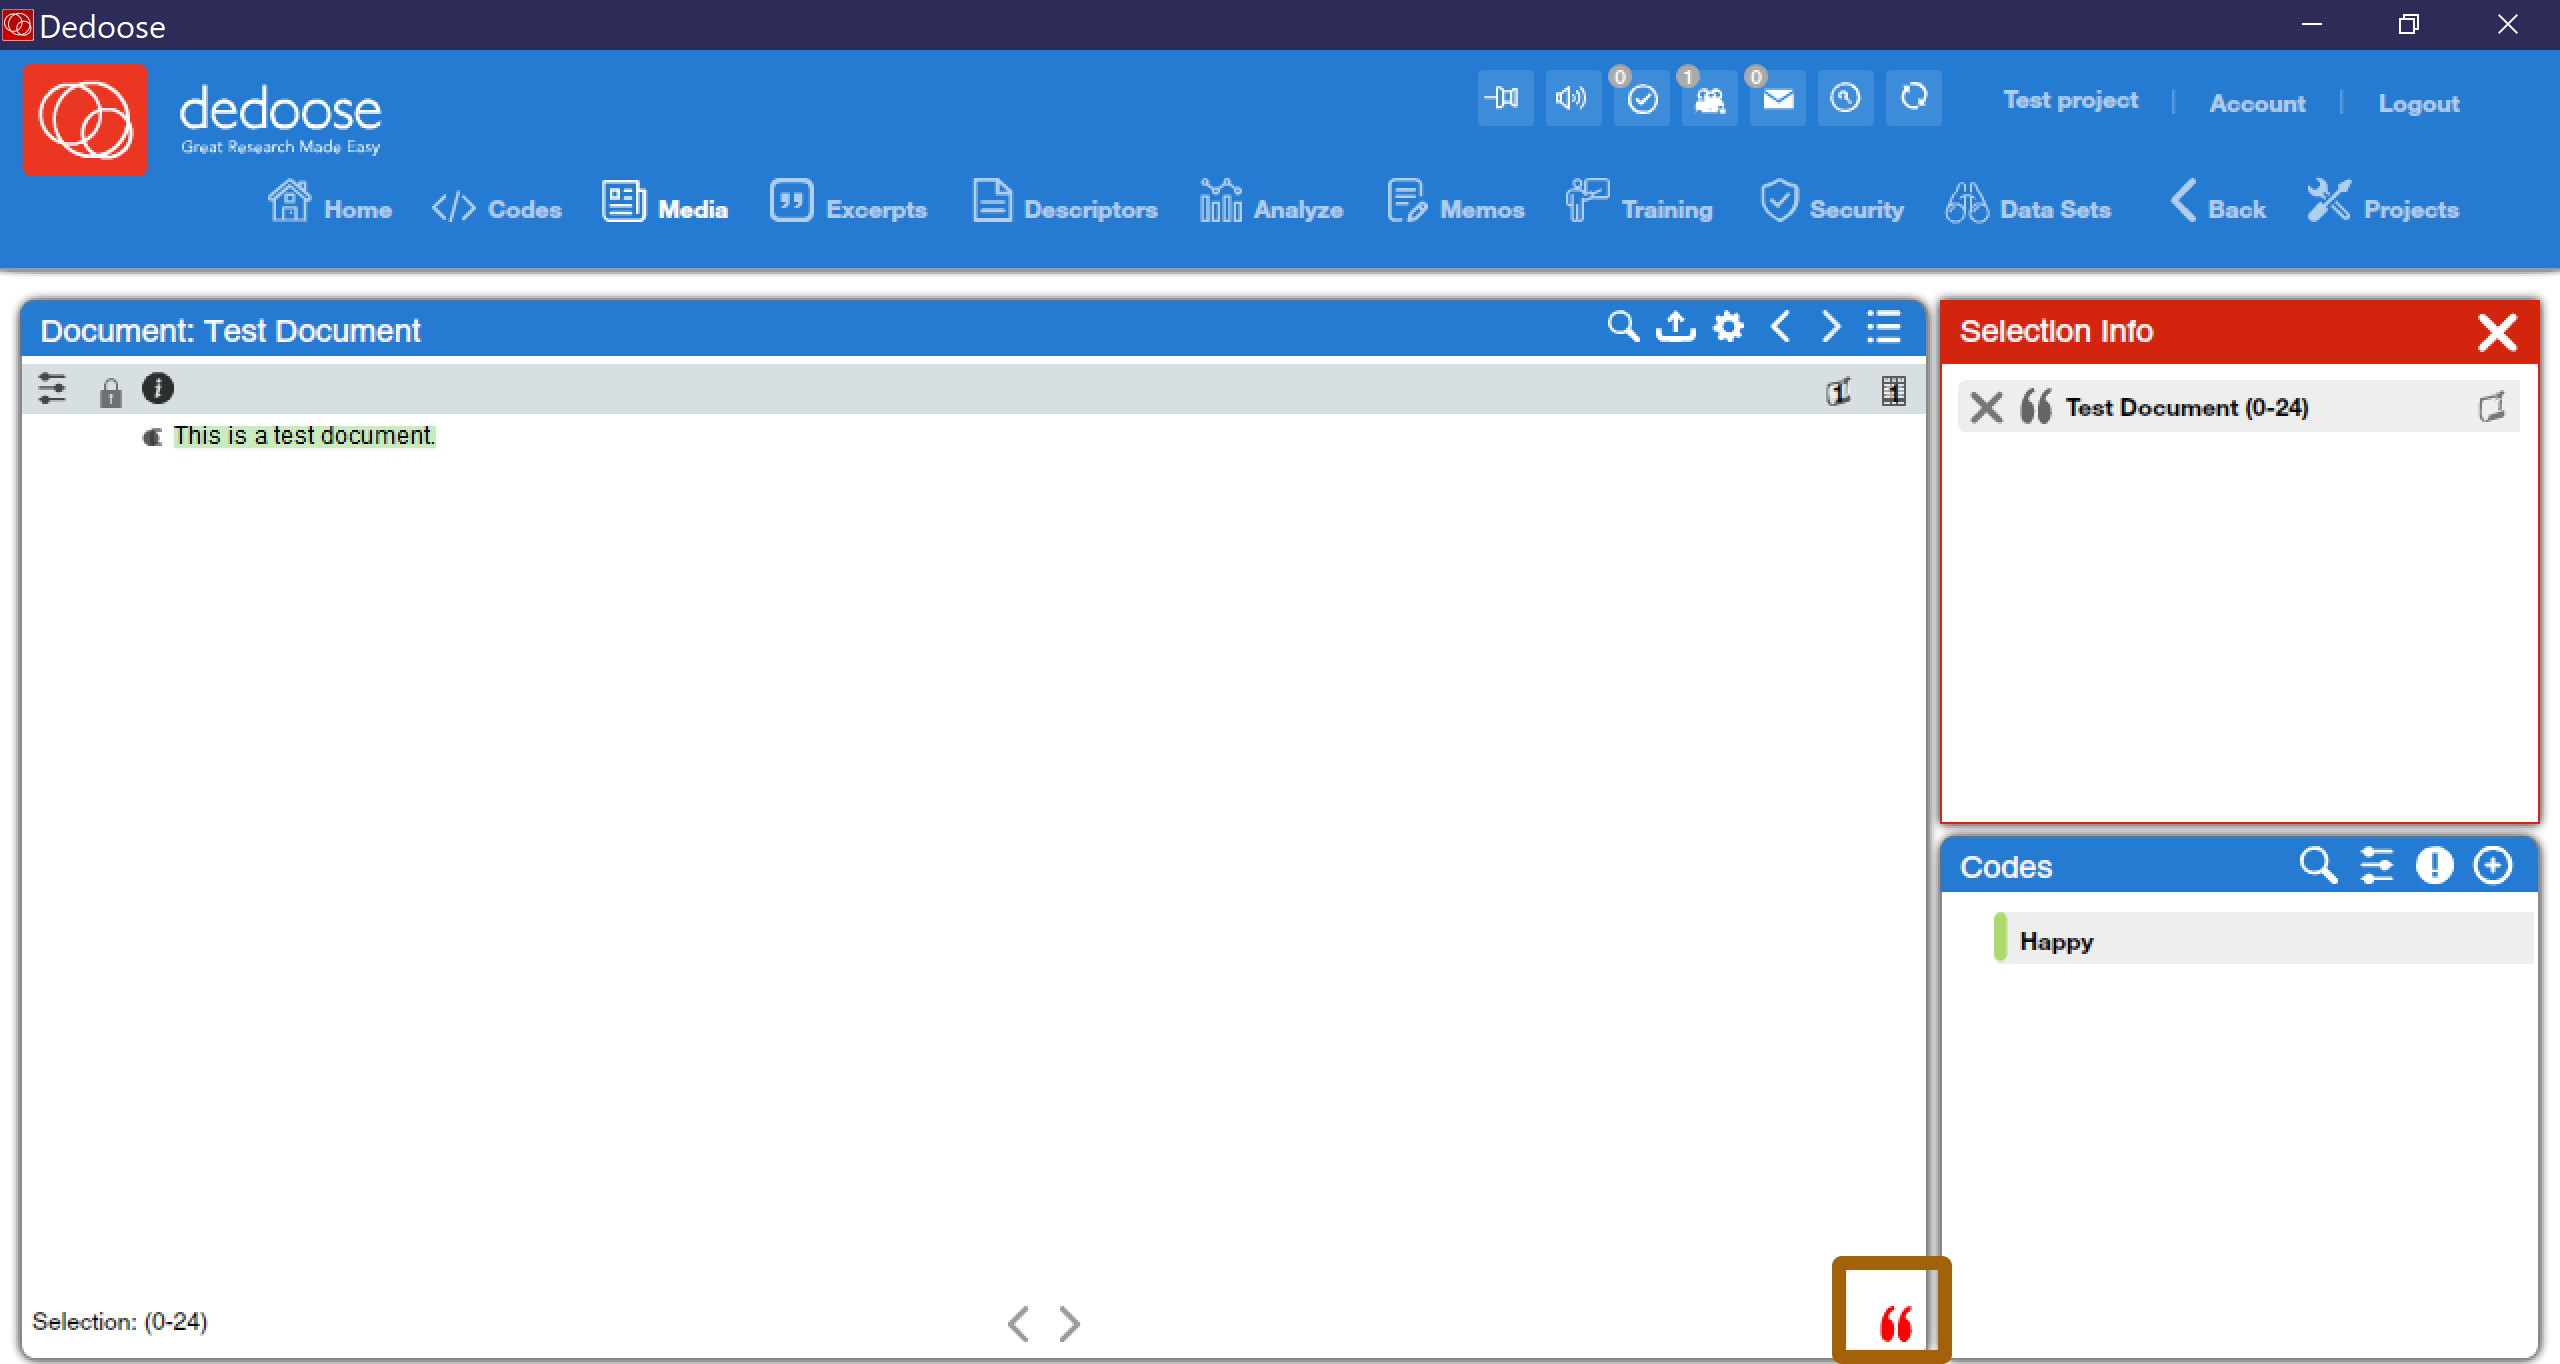
Once you have created an excerpt, you can then apply codes by either dragging each individual code from the “codes” box to the “selection info” box or by double-clicking on the code in the “codes” box. If you want to remove a particular code you have added to an excerpt, just click the X next to that code in the “selection info” box. When you are done applying codes to a given excerpt, click the X next to “selection info” to exit the editing mode and move on to create your next code. If you want to re-open a particular excerpt, you can click on the black bracket next to the excerpt, and this will permit you to add additional codes or delete the excerpt. When you are done with a given text, you can use the < and > icons at the bottom of the screen to move on to the next text.
Figure 6 provides an example of what it might look like after a complete (short) text is coded. You can see how each excerpt appears highlighted in color, with a black bracket in the margin. One excerpt is currently selected, and the “selection info” box shows the codes that the coder applied to that excerpt. Do note the typical length of the excerpts—when selecting an excerpt, analysts should strive to select a unit of text that represents a complete idea or utterance, whether that complete idea/utterance is just a few words or whether it is a paragraph or more in length.

Working with Codes
While the process of coding primarily involves moving through each text, creating excerpts, and applying relevant codes (and sometimes repeating this process as the code tree evolves or additional texts are added to the dataset), Dedoose does offer some tools that can further enhance the coding process.
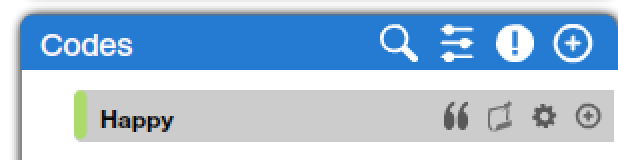
In the chapter on Data Management with Dedoose, you learned about linking memos to texts. But what if the memo you write is less connected to a given text and instead is generated by observations made while applying a particular code? In that case, you may wish to link a memo to a code. The icon that looks a bit like a scroll of paper next to the code, as shown in Figure 7—the one after the quotation mark icon—allows analysts to link memos to individual codes.
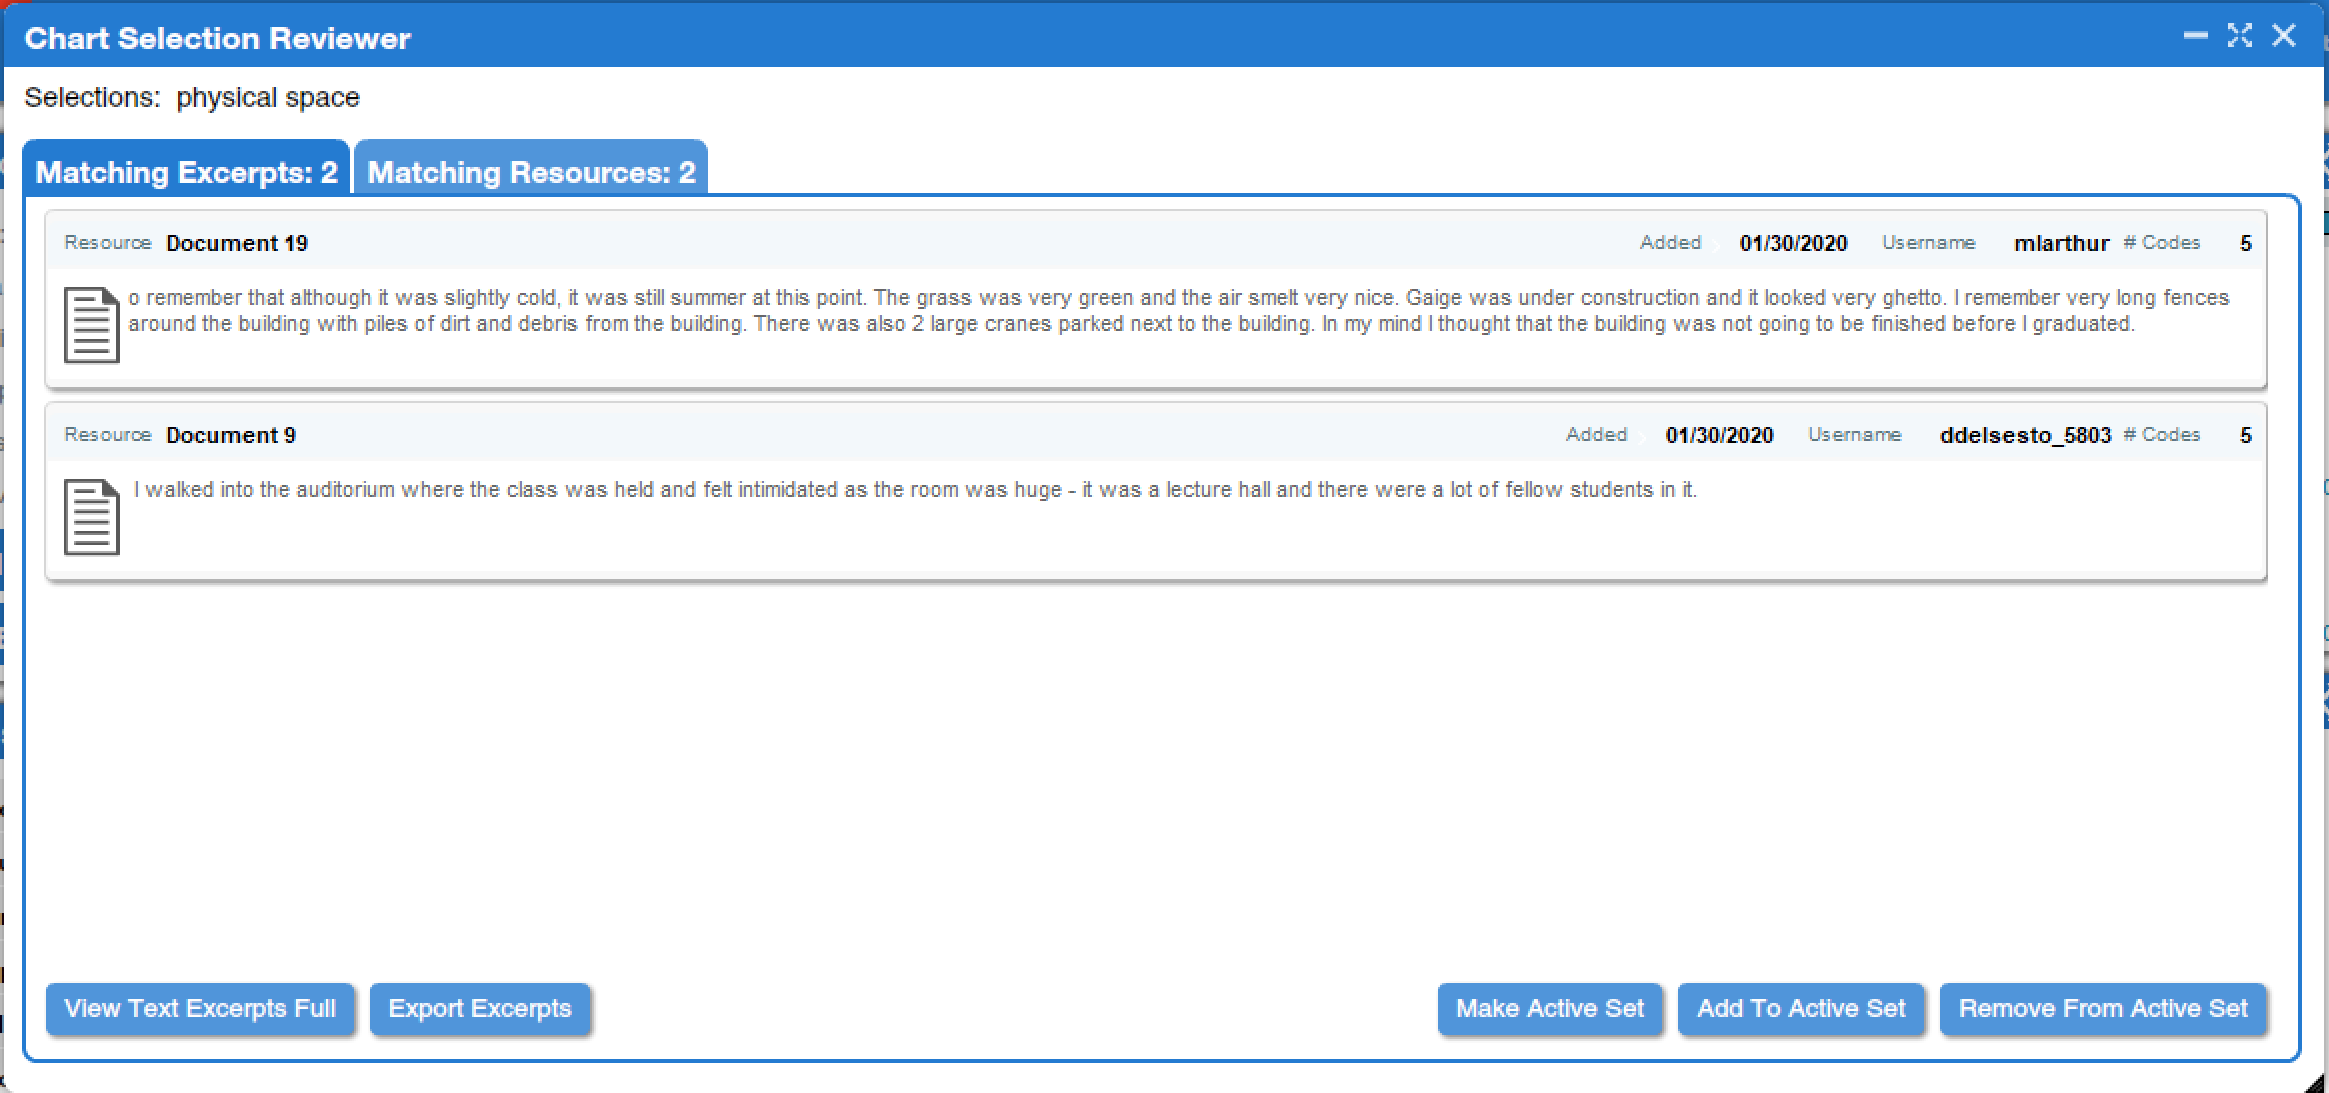
The quotation mark icon brings up a window, as shown in Figure 8, that includes all of the excerpts to which a given code has been applied. The “view text excerpts in full” button shows the complete text of each excerpt and all codes that have been applied to it. You can also export all of the excerpts. If you double-click on a specific excerpt, you can copy and paste the text of that excerpt, which is useful when you need to include a quote in the paper or talk you are preparing. After double-clicking, there is also a “view in context” button, which loads the text in question in the background such that after you close the various pop-up windows you will be able to view it.
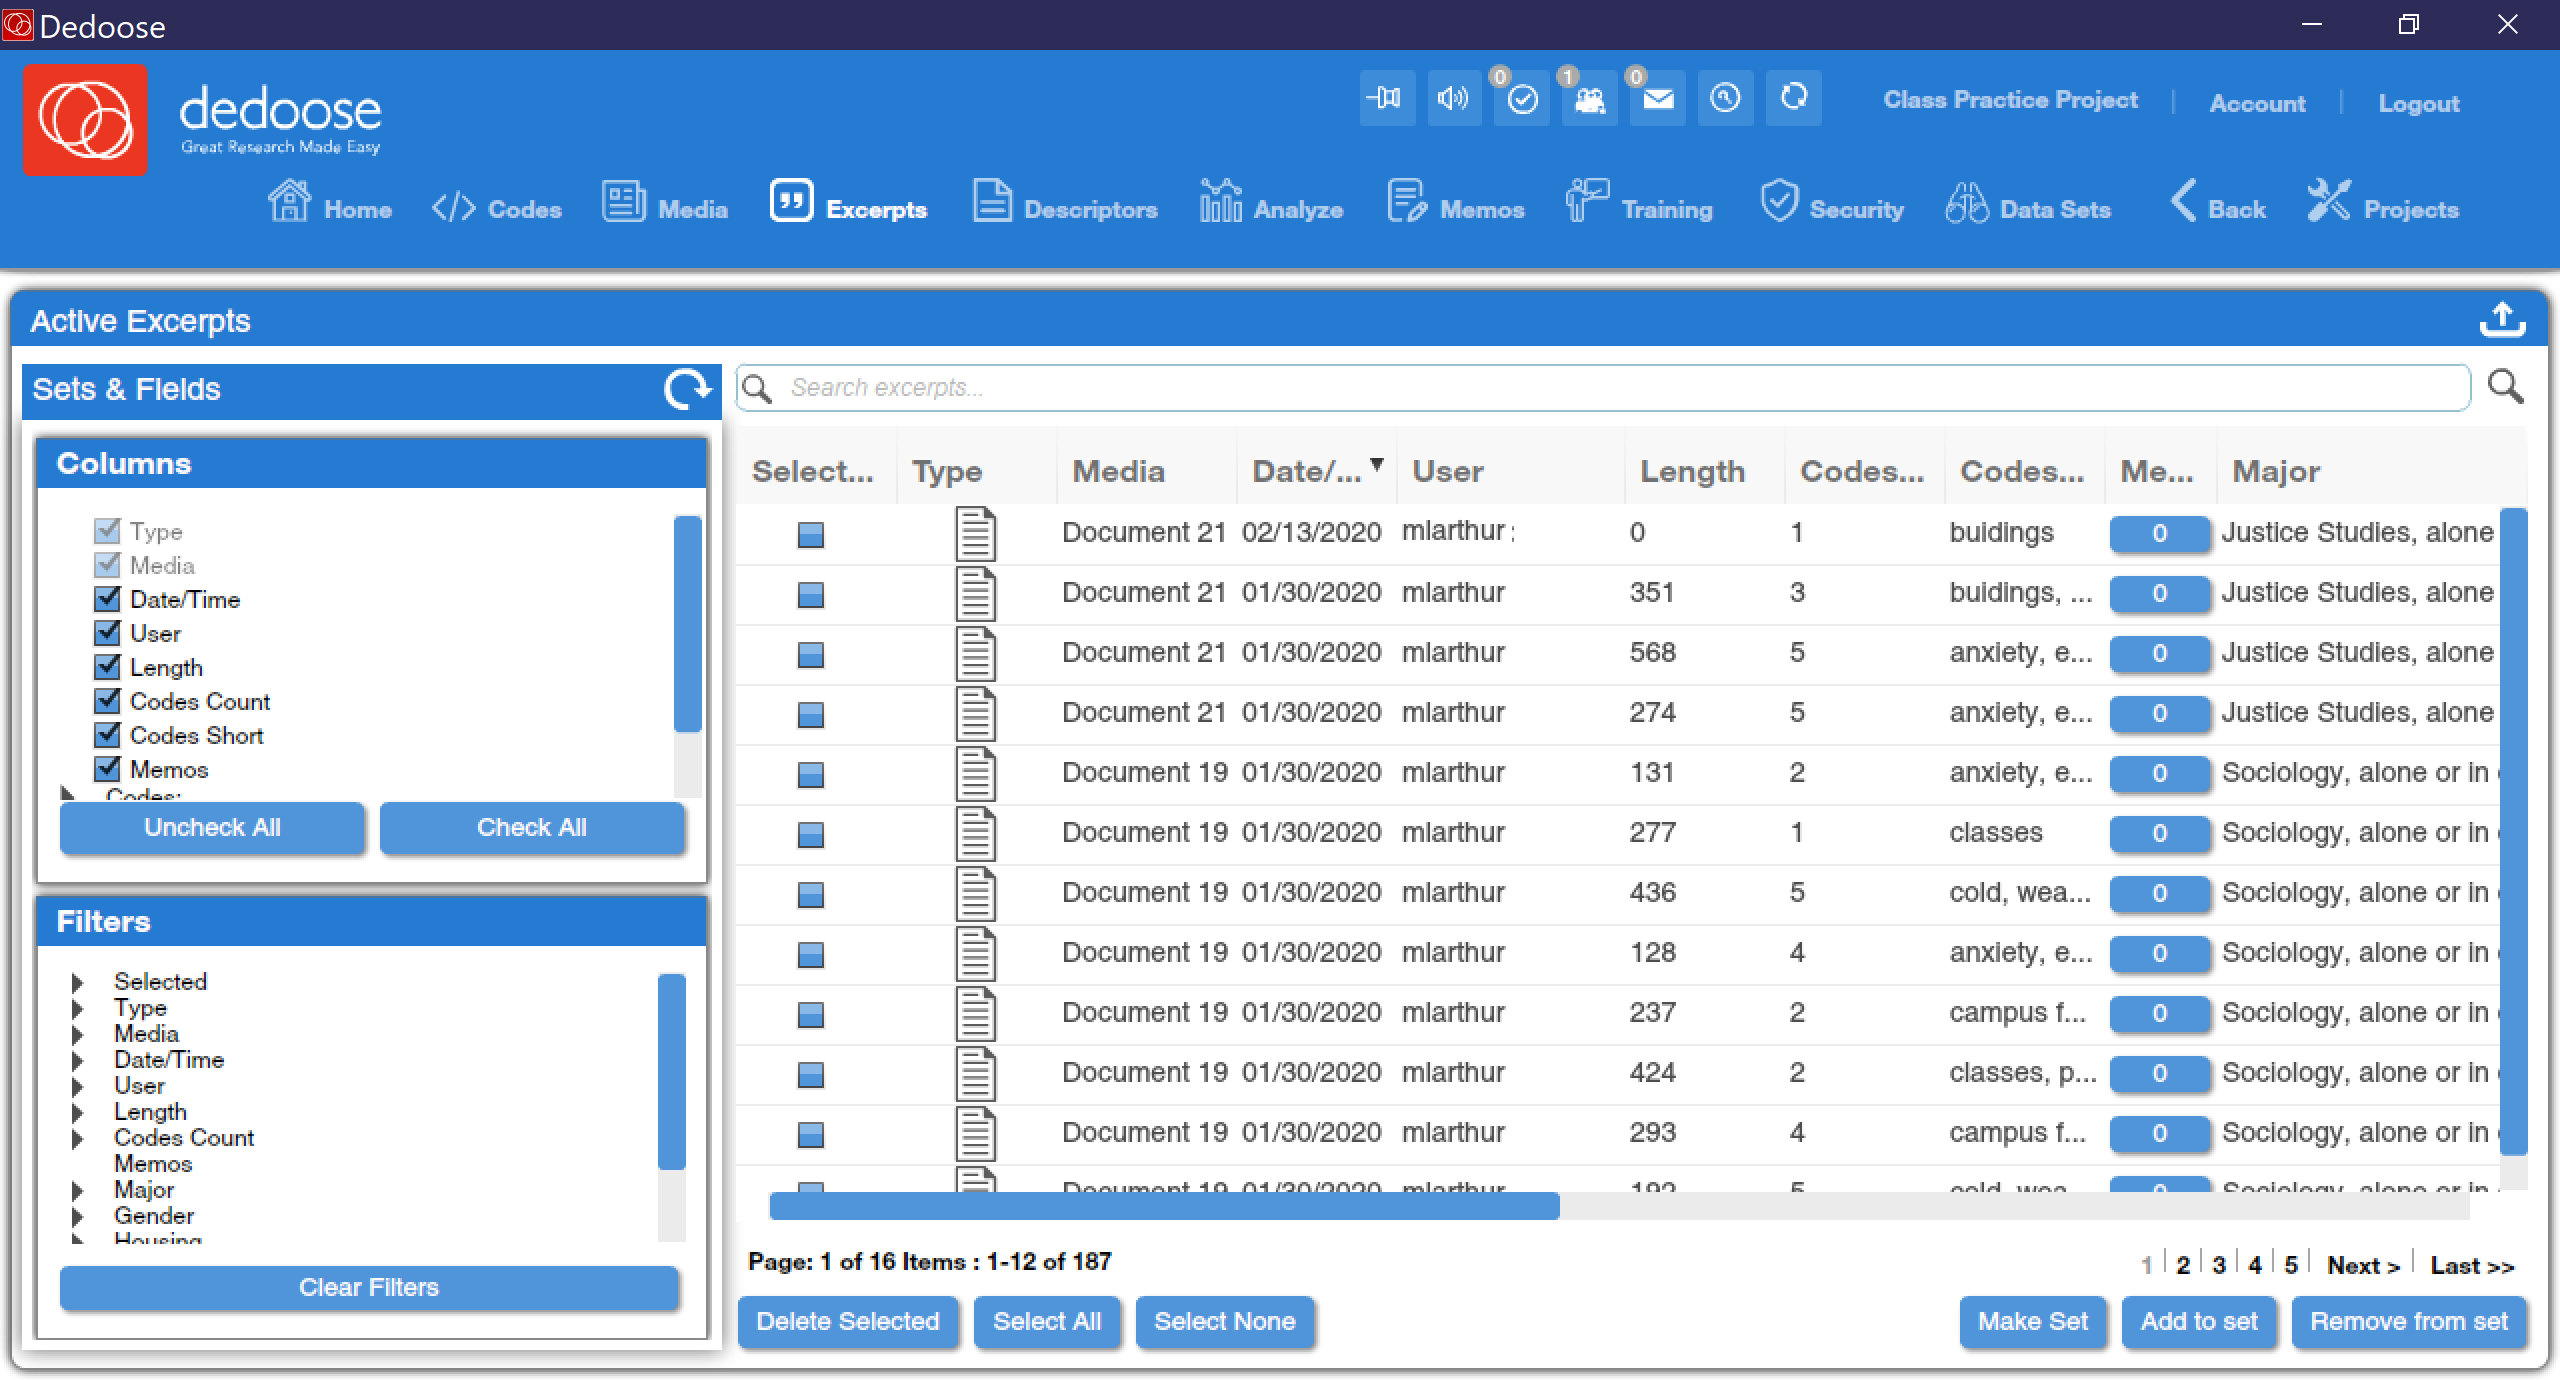
Similar information is available by clicking on the “Excerpts” tool at the top of the screen, as shown in Figure 9. The excerpts tool brings up a list of all the excerpts in a given project and shows, for each one, which text it is part of, when it was created, who created it, how long it is, how many codes were applied to it, which codes, and—if applicable—any memos or descriptors. The list of excerpts can be sorted or filtered by any of these columns, and double-clicking on any row will bring up the specific excerpt in a pop-up window.
A final tool worth noting for those who are coding in teams is the Training Center. While it is beyond the scope of this text to detail the workings of the Training Center, it is designed to help coding teams enhance their interrater reliability. In short, team leads can select a variety of excerpts and codes as part of a coding test that all members of a coding team then take. After coders complete the test, they and their team leads can see an overall interrater reliability score comparing their coding to the codes applied by the initial coder to those excerpts selected for the test, and they can also delve deeper by looking at agreement and disagreement rates and Kappa scores for each individual code. Reports can be excerpted, and team members can also view specific code applications to see how their coding compares to the initial coding seeding the test.
A final note: the analysis tools in Dedoose do rely on completed coding, so finish coding all your texts before delving into analysis.
Exercises
- Return to the five oral history transcripts you selected in the exercises for the chapter Qualitative Data Analysis with Dedoose: Data Management. Read through the transcripts and develop a code tree including at least five parent codes and additional child codes as relevant. Enter the code tree into Dedoose.
- Choose one of your transcripts and code that transcript completely.
- Write a memo focusing on what the transcript you coded tells you in relation to one or two of the codes you selected.
Media Attributions
- code screen © Dedoose is licensed under a All Rights Reserved license
- new code window © Dedoose is licensed under a All Rights Reserved license
- add child code © Dedoose is licensed under a All Rights Reserved license
- code tree © Dedoose adapted by Mikaila Mariel Lemonik Arthur is licensed under a All Rights Reserved license
- create excerpt © Mikaila Mariel Lemonik Arthur is licensed under a All Rights Reserved license
- example coding © Mikaila Mariel Lemonik Arthur is licensed under a All Rights Reserved license
- code tools © Dedoose is licensed under a All Rights Reserved license
- view excerpts © Dedoose is licensed under a All Rights Reserved license
- excerpts window © Dedoose is licensed under a All Rights Reserved license
The process of assigning observations to categories.
A hierarchically-organized coding system.
A measure of association especially likely to be used for testing interrater reliability.
